


Customers worldwide rely on Wavecrest Computing for accurate, reliable Web-use management software–backed by a customer support team dedicated to your success.
Cyfin - SonicWall Firewall Support
New Release - Version 9.5.0 for Cyfin Now Available
IMPORTANT NOTE: for 9.2.8 and earlier customers please contact support for upgrade.
Join our Early Adopter Program
Receive the latest solutions and have the opportunity to provide feedback directly to our development team. To learn more click here.
Cyfin Advanced Reporting for SonicWall
Cyfin - SonicWall Configuration
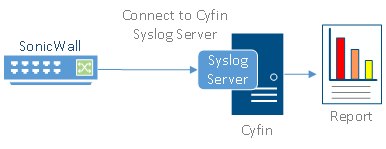
Cyfin is installed on a server, not on the SonicWall appliance.
Log File Setup
Log File Type: SonicWall Security Appliance
SonicWall Configuration Steps
The following information applies to versions earlier than SonicOS 6.2.6 Content Filtering Service (CFS) release 4.0.
In order to get SonicWall Web traffic URLs into the Cyfin syslog, you must first have the SonicWall Content Filtering Service enabled. You must also enforce the Content Filtering Service within the zone (LAN) in which your traffic will be forwarded. In order to get the service enabled and enforced, follow the steps below:
- Log on to your SonicWall interface.
- Go to Security Services – Content Filter – Configure.
- Select the Log Access to URL box.
- Go to Network – Zones. Find the LAN zone and click Configure.
- Select the Enforce Content Filtering Service box.
- Apply all changes above.
To verify that the changes were made successfully, you can make a copy of the raw syslogs that are generated after the change. These files are in the write location of your Cyfin installation (default location is …Wavecrest\Cyfin\wc\cf\log). You should see files being written called syslogXXXXXXXX.txt, if you have already configured the Cyfin setup correctly.
Make a copy of the most recent file after the change, and use a text editor (Notepad++ works well) to open the file. Search for the fields dstname= and arg= to confirm that they exist. You can use Ctrl+F to find these strings. You may need to wait for a short time after making the changes for them to take effect.
Note: If the log files are showing as invalid in Cyfin, see Unable to see Web site hits information in SonicWall for a possible resolution.
Cyfin Configuration Steps
Cyfin Syslog Server listens for syslog messages from your SonicWall device. Both UDP-based and TCP-based messages are supported.
- Select the SonicWall Syslog log file configuration in Cyfin for your SonicWall device.
- Specify the Directory in which the log files will be created. The default directory is [InstallPath]\wc\cf\log.
- Select Enable Syslog Server.
- For Port Type, select UDP or TCP for the Internet protocol you want to use.
- In the Listening Port field, the default port number is 1455. The listening port will be used by your SonicWall device to transfer the data. You may change this number if necessary.
- At your SonicWall device, specify the IP address of the Cyfin server and the listening port, and submit the syslog messages.
- Your log files will be created and displayed in the Log File Viewer in Cyfin.
- If you have many of the same SonicWall devices, use one log file configuration with one listening port, and point each SonicWall device to the same listening port.
© Copyright 1996-2024 Wavecrest Computing. All Rights Reserved.