
Palo Alto Firewall
Cyfin is designed to work with Palo Alto Firewall. It integrates easily into your current system configuration.
Company Overview
Palo Alto Networks was founded in 2005 and is one of the world's largest cybersecurity companies. Its next-generation firewall platform provides application awareness, user identification, and URL filtering that generates detailed traffic logs — including web activity records that Cyfin processes into employee web use reports. Palo Alto Networks firewalls also support AI Security features that capture AI-specific log fields, enabling Cyfin to identify which AI tools employees are accessing and for how long.
Note on AI Tool Reporting: When Palo Alto Networks AI Security or Advanced URL Filtering is active, Palo Alto logs include AI-specific categories. Cyfin uses these fields to produce dedicated AI usage reports showing which generative AI tools — such as ChatGPT, Gemini, or Microsoft Copilot — employees are accessing, how often, and for how long. See the Cyfin AI Reporting page for details.
Cyfin - Palo Alto Firewall Configuration
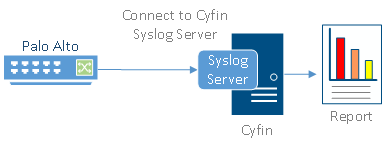
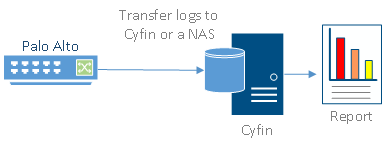
Cyfin is installed on either a Windows or Linux server. Palo Alto logs are transfered to Cyfin either by syslog or FTP. See more instructions below.
Log File Setup
Log File Type: Palo Alto Firewall
Palo Alto Networks Configuration Steps
The following steps are required to forward Palo Alto logs to Cyfin Syslog Server:
- Create a syslog server profile.
- Configure a log forwarding profile to select the logs to be forwarded to Cyfin syslog server.
- Assign the log forwarding profile to security rules.
The logs that must be forwarded are the Threat logs with Informational severity. Informational Threat logs include URL Filtering, Data Filtering, and WildFire logs.
Syslog Server Profile
- In your Palo Alto Firewall user interface, go to Device – Server Profiles – Syslog.
- Click Add at the bottom of the screen.
- Enter the following information:
- Name – Cyfin
- Syslog Server – IP address of where Cyfin is installed
- Transport – UDP
- Port – 1455
- Format – BSD
- Facility – LOG_USER
- Click OK to save the server profile.
- Click Commit at the top of the screen to commit the change.
Log Forwarding Profile
- Go to Objects – Log Forwarding.
- Select the syslog server profile (Log-Forwarding-Profile) for forwarding Threat logs to Cyfin.
- In the Threat drop-down field, ensure that for the Severity Informational option, Cyfin is selected in the Syslog column.
- To forward URL Filtering logs, add Log Type "URL" and set Severity to "Informational." Then set Syslog to "Cyfin."
- To forward Traffic logs, add Log Type "Traffic" and set Severity to "Informational." Then set Syslog to "Cyfin."
- Click Commit at the top of the screen to commit the change.
URL Filtering Profile
To log the traffic from URL Filtering logs, you may need to adjust the Site Access for each allowed URL category.
- Go to Objects – URL Filtering – URL Filtering Profile.
- Select Categories – Site Access.
- Filter by "Allow."
- Change "Allow" to "Alert" for each category listed.
Security Policy Rule
- Go to Policies – Security.
- Select the rule for which the log forwarding needs to be applied.
- Apply the security profile to the rule.
- Go to Actions and in the Log Forwarding drop-down field, select the log forwarding profile.
- Click OK. By default, when Threat logs are forwarded to Cyfin Syslog Server, the logs will have several fields including source IP address, destination IP address, and URL.
- Click Commit at the top of the screen to commit the change.
Now, you can configure Cyfin to write the forwarded Palo Alto log files to syslogYYYYXXXX.txt files.
Cyfin Configuration Steps
Cyfin Syslog Server listens for syslog messages from your Palo Alto device. Both UDP-based and TCP-based messages are supported.
- Select the Palo Alto Firewall log file configuration in Cyfin for your Palo Alto device.
- Specify the Directory in which the log files will be created. The default directory is [InstallPath]\wc\cf\log.
- Select Enable Syslog Server.
- For Port Type, select UDP or TCP for the Internet protocol you want to use.
- In the Listening Port field, the default port number is 1455. The listening port will be used by your Palo Alto device to transfer the data. You may change this number if necessary.
- At your Palo Alto device, specify the IP address of the Cyfin server and the listening port, and submit the syslog messages.
- Your log files will be created and displayed in the Log File Viewer in Cyfin.
- If you have many of the same Palo Alto devices, use one log file configuration with one listening port, and point each Palo Alto device to the same listening port.

