
Forefront TMG
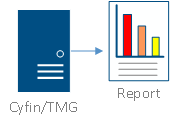
Cyfin is designed to work with Forefront TMG. Your Cyfin system can be configured as an on-box solution or an off-box solution.
Company Overview
Initially released in the late 1990s as Microsoft Proxy Server and then in the early 2000s as ISA Server, Microsoft Forefront Threat Management Gateway (TMG) was built on the foundation of ISA Server 2006. It is a comprehensive secure Web gateway solution that helps to protect employees from Web-based threats. Forefront TMG also delivers simple, unified perimeter security with integrated firewall, VPN, intrusion prevention, malware inspection, and URL filtering.
Cyfin - Forefront TMG On-Box Configuration
Cyfin is installed directly on Forefront TMG.
NOTE: For ISA Server configurations, click here.
Data Source Setup
Standard Configuration
Log File Type: Forefront TMG (TMG Format)
Default Directory: [InstallPath]\wc\cf\log
Alternate Configuration
Log File Type: Forefront TMG (W3C Extended Format)
Default Directory: [InstallPath]\wc\cf\log
NOTE: Cyfin can be installed directly on the Forefront TMG or on a stand-alone machine. The Forefront TMG File Format uses local time for the data record time stamp. The ISA W3C Extended Log File Format uses GMT time (set by the Forefront TMG and is not configurable).
SQL Server Database Configuration
NOTE: It is presumed that you have already set up a SQL database and are logging to it from your TMG Server. The steps that follow will not work if you have not set that up first.
If you are successfully logging to a SQL database, please perform the following steps:
- Allow Open Database Connectivity. It is important to set up SQL Server to accept ODBC (Open Database Connectivity). On the machine with SQL Server installed on it, complete these steps:
- Log on to SQL Server Management (Studio).
- Expand the server name.
- Expand the Security folder.
- Right-click the Logins folder and click New Login.
- Enter a new login name (example: wavecrest).
- Select the SQL Server Authentication radio button.
- Type a password (example: wavecrest).
- Uncheck Enforce Password Policy.
- Click the Default db pulldown, and select the database our product will access.
- Click OK to save and exit.
- Create new account for your Wavecrest product to access the SQL Server. You need to set up another account for the product to communicate with your SQL Server database:
- In SQL Server Management (Studio), expand the Databases folder.
- Expand the database that the Wavecrest product will access.
- Expand the Security folder.
- Right-click the Users folder, and click New User.
- Type in the same user and login name (example: wavecrest). *We recommend using the same credentials that you created earlier.
- Select dbo as the Default Schema. Use the browse buttons to find the check box for dbo, select it, and then click OK to save.
- For Database Role Membership (bottom section of the page), select the following check boxes:
- dbdatareader
- dbdatawriter
- Click OK to save and exit.
- Proceed with configuration in your Wavecrest product.
SQL Server Express Database Configuration
WARNING: You will need SQL Server Management Studio to complete the required steps for this log file selection. It is not installed by default with TMG, so you must obtain the installation file. When you have the file saved locally to the machine, install it using these instructions:
- Double-click the .exe file for SQL Server Management Studio to open it.
- In the left pane menu, click Installation.
- In the right pane, click New SQL Server stand-alone installations or add features to an existing installation.
- Click OK at the first screen ("Setup Support").
- Click Install at the next screen.
- Click Next when the installation ends.
- In the right pane, change the selected radio button to Add features to an existing instance of SQL Server.
- Use the pulldown to select MSFW.
- Click Next.
- In the right pane, under Shared Features, check the box Management Tools - Basic.
- Click Next until you arrive at the Ready to Install screen.
- Click Install.
- When it completes, click Next.
- Click Close.
- Click the "X" to close out of the SQL Server Installation Center dialog box.
Please perform the following steps carefully and in order:
- Open SQL Server Configuration Manager.
- Expand SQL Server Network Configuration.
- Highlight Protocols for ISARS, still in the left pane.
- In the right pane, right-click TCP/IP and select Properties.
- Click the IP Address tab, and scroll to the bottom of the dialog box.
- Change the TCP Port to 1434.
- Click Apply. A dialog box will appear stating you need to restart a service. Click OK.
- Click OK again to close the dialog box.
- Minimize (but do not Close!) the SQL Server Configuration Manager, and go to your machine's Services (this will be under Administrative Tools).
- Restart the SQL Server (ISARS) service.
- Minimize (but do not Close!) your Services dialog box, and maximize the SQL Server Configuration Manager again.
- In the left pane, highlight Protocols for MSFW.
- In the right pane, right-click TCP/IP and select Enable.
- Next, right-click TCP/IP again and this time, select Properties.
- Click the IP Address tab, and scroll to the bottom of the dialog box.
- Clear out the numbers appearing in the TCP Dynamic Ports box, so that it is completely blank.
- Next, in the TCP Port box, type 1433, so that the TCP Port will now be 1433.
- Click Apply. A dialog box will appear stating you need to restart a service. Click OK (we will restart it later in this procedure).
- Click OK again to close the dialog box.
- Close SQL Server Configuration Manager.
CRITICAL NOTE: For the remaining steps in the process, you must have SQL Server Management Studio installed. It is not installed by default with most TMG installs.
- Open SQL Server Management Studio. If you don't see it, try typing studio in the Start - Search box. This will either show you where it is or launch the program.
- Connect to your SQL Server. Use the following credentials:
- Server type = Database Engine
- Server name = TMG \MSFW
- Authentication = Windows Authentication
- Right-click the top (Server) node, and go into Properties.
- In the left pane, highlight Security.
- In the right pane, change the Server Authentication radio button to SQL Server and Windows Authentication mode.
- Click OK. You will see a message stating that changes won't take effect until the SQL Server is restarted. Click OK.
- In the left pane, expand the Security folder.
- Right-click the Logins folder, and select New Login.
- In the right pane, for Login Name, type wavecrest.
NOTE: This label is very important. The product will expect this exact login name only.
- Next, change the radio button selection to SQL Server Authentication.
- Type this password: password.
NOTE: This label is very important. The product will expect this exact password only.
- Confirm the password by typing it in again.
- Uncheck the Enforce password expiration check box.
- Next, in the left pane, highlight Server Roles.
- Check the check box for sysadmin.
- Click OK.
- Close SQL Server Management Studio.
- Connect to your SQL Server. Use the following credentials:
- Restart Services.
- In Administrative Tools - Services, restart:
- SQL Server (ISARS) service (only if you did not do so earlier).
NOTE: It is important that this one be restarted BEFORE the MSFW service!
- SQL Server (MSFW) service.
- SQL Server (ISARS) service (only if you did not do so earlier).
With these steps complete, you are ready to proceed with log file configuration.
Cyfin - Forefront TMG Off-Box Configuration
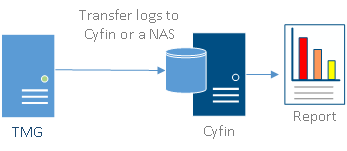
Cyfin is installed on a server other than Forefront TMG.
Log File Setup
If Cyfin is installed off-box, the log files need to be transferred to the Cyfin box or put into a suitable location where Cyfin can read them. This can be done in a few ways:
- Copy the log files to the Cyfin machine's local drive (this is what we recommend for best network performance). To automate this process, you can create a script to copy the logs over at a specific time each day.
- FTP the logs over to the Cyfin machine's local drive. Again, this process can also be automated with scripts.
- Have the log files reside on a network drive. NOTE: Cyfin cannot browse the network. For this log file option to be successful, two things must be true:
- The network drive must be mounted on the network.
- The Cyfin Service logon account needs to be a domain account with administrative rights.
Please see the section above for information about data source setups, keeping in mind that the directory path for log files will be different for an off-box solution.
NOTE: Now that SQL 2008 Express is installed, we need to configure the Network options that are disabled by default.
- In the Start Menu, open Programs - Microsoft SQL Server 2008 - Configuration Tools - SQL Server Surface Area Configuration.
- In the Surface Area Configuration utility, click the link SQL Server Configuration Manager.
- Expand SQL Server Network Configuration and select Protocols.
- Enable TCP/IP. If you need Named Pipes, then you can enable them here as well.
- Close SQL Server Configuration Manager.

